Wednesday, December 2, 2009
Wow, I'm far behind!!
Tuesday, September 29, 2009
Peach Pie

You can use any type of crust you like. If you use a butter or shortening crust or the one I used here are some tips. Make sure you butter and shortening are cold. Cut up your butter and rechill before using to ensure it is completely cold. Use a food processor or pastry cutter to combine your ingredients. Don't use your hands because that will start to melt the fats in your crust. The key to a flakey crust having nice cold butter and/or shortening because as your crust bakes the fats melt and evaporate leaving nice air pockets and thus a flakey crust. Make sure your water is truly ice cold and not just cool.

Peach Pie
Crust: From Goodhousekeeping
2 1/2 c. flour
1/2 tsp salt
10 tbsp butter, cold and cut up
6 tbsp shortening, cold
6 1/2 Tbsp ice water
In a food processor, combine flour and salt. Pulse until combined. Add in butter and shortening. Pulse until it resembles coarse crumbs. Add ice water 1 Tbsp at a time until large moist crumbs begin to form. Remove from food processor and shape into 2 discs with one slightly larger than the other. Chill for 30 minutes.
Filling: Adapted from Betty Crocker and Better Homes and Gardens Cookbooks
6 c. peeled and sliced peaches
2/3 c sugar
1/3 c flour
1/4 tsp ground cinnamon
1/4 tsp ground nutmeg
1 tbsp. minute tapioca
1 tsp lemon juice
Combine all ingredients in a bowl and allow to sit for about 20 minutes if using fresh peaches or 45 minutes if using frozen peaches. Roll out larger dough disc and place in a 9 inch pie plate. Pour in peach mixture. Roll out second disc and place over top. Trim pie edges and flute edges. To add decorative edges, tuck in top crust into bottom crust and secure decorative cut outs around the edge with an egg wash. Egg wash top of pie crust and sprinkle with cinnamon and sugar. Place three slits on top of pie to vent steam. Bake at 375 for 45-50 minutes or until crust is golden and filling is bubbly. Cool, cut and serve.


Saturday, September 5, 2009
Homemade Kit Kat Bars

From Paula Deen
80 Club Crackers
1 c. unsalted butter (2 sticks)
2 c. Graham Cracker Crumbs, this is about 14 sheets or so
1 c. packed brown sugar
1/2 c.milk
1/3 c. sugar
2/3 c. creamy peanut butter
1/2 c. semisweet chocolate chips
1/2 c. butterscotch chips
Line a 9x13 pan with aluminum foil making sure you have excess hanging out the ends. Line the bottom with a single layer of Club Crackers. You may need to trim the crackers to fit.
In a large sauce pan, melt your butter over medium heat. Add graham cracker crumbs, brown sugar, milk, and white sugar. Bring to a boil and boil 5 minutes stirring constantly. Remove from heat and pour half of this mixture over the Club crackers. Then, top with another layer of Club Crackers, pour on remaining sauce mixture. Finish off with a final layer of Club Crackers.
In another sauce pan, melt your peanut butter, semisweet chocolate chips and butterscotch chips over medium-low heat, stirring constantly. Stir until smooth. Pour over crackers and spread evenly. Cover and chill bars for 1 hour or until set (mine probably set in about 1 1/2 hours). Lift bars from pan with foil from pan and cut. Store in the refrigerator. Yield: 1 (9x13) pan (I cut mine into 36 bars)

I had some lumps but they were still great!

Look at those lovely layers!

Sunday, August 30, 2009
Grandma Bush's Oatmeal Cookies

1 c. shortening
1 c. brown sugar
1 c. white sugar
2 eggs
1 tsp vanilla
1 1/2 c flour
1 tsp salt
1 tsp baking soda
2-3 c. oatmeal (I use 3 because I like a lot of oatmeal)
Cream together shortening and sugars. Mix in eggs and vanilla until well combined. Mix in flours, salt and baking soda. Combine well. Stir in oatmeal. Drop onto cookie sheet lined with parchment paper and bake at 350 for 10 minutes. Remove to a cooling rack. Yield 32 cookies.


Sunday, August 23, 2009
Chicken Tamale Casserole

From Cooking Light
Yield: 8 servings
*9 POINTS+ per serving
4 ouces pre-shredded Mexican Cheese Blend
1/3 c. fat-free milk
1 egg
1 tsp. ground cumin
1/8 tsp. ground red pepper
1 (14 3/4 oz) can Cream Style Corn
1 (8.5 oz) box Corn Bread mix (Like Jiffy Brand)
1 (4 oz) can green chiles, drained
1 (10 oz) can red enchilada sauce
2 c. shredded chicken breast
1/2 c sour cream, reduced fat
Preheat oven to 400°. Combine 1/4 cup cheese and next 7 ingredients (through chiles) in a large bowl, stirring just until moist. Pour mixture into a 13 x 9–inch baking dish coated with cooking spray. Bake at 400° for 15 minutes or until set. Pierce entire surface liberally with a fork; pour enchilada sauce over top. Top with chicken; sprinkle with remaining 3/4 cup cheese. Bake at 400° for 15 minutes or until cheese melts. Remove from oven; let stand 5 minutes. Cut into 8 pieces; top each serving with 1 tablespoon sour cream.


Tuesday, July 28, 2009
Oreo Truffles

No one can deny that Oreo Cookies are uber delicious. So, what could be better than turning them into a truffle?!? Lately I've been really into trying to make different types of chocolates and candies. I first had these truffles at my husband's cousin's wedding. Then, my sister-in-law Joni made them for my other sister-in-law's baby shower. They are fantastic. I dusted mine with cocoa powder, but they would be adorable sprinkled with Oreo crumbs. This made about 42 truffles for me. Next time, I will try to temper my chocolate so that it gets nice and shiny and won't get so soft at room temperature. If your chocolate chips are a little too thick, add about 1-2 Tbsp. vegetable oil per 1 cup of chocolate chips until desired consistency is reached. Here is the recipe from Joni:
8 oz block of cream cheese, at room temperature
1 package of regular Oreo Cookies
1 tsp vanilla
1 pkg semisweet chocolate chips or dark chocolate chips
Twist apart Oreo cookies. Scrap out cream filling and place in mixing bowl. Crush cookies in ziplock bag with a rolling pin. Add to bowl with oreo cream filling. Add cream cheese and vanilla. Beat with mixture until no white remains. Roll into balls and place on parchment paper or wax paper lined baking sheet. Refridgerate for 1 hour. Melt chocolate chips over double boiler or in a microwavable bowl at 30 second intervals stirring until smooth. (Add oil to choclate if necessary to thin out for dipping if chocolate is too thick) Dip or Roll oreo mixture in melted chocolate. Place back on lined baking sheet. Sprinkle with cocoa powder or cookie crumbs. Refridgerate until hardened. Store in the refridgerator.


Saturday, July 25, 2009
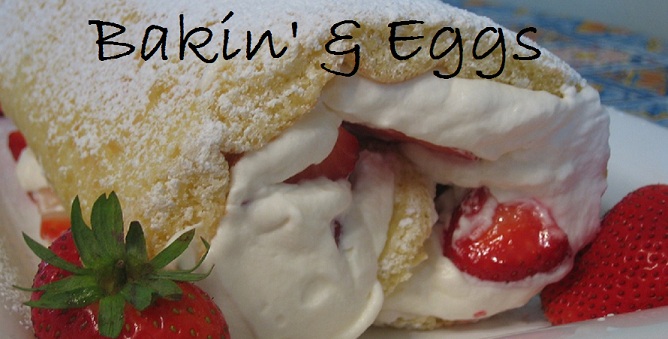
My First Ever Cake Roll & Some Tasty Lasagna
1/2 c grated parmesan cheese
2 eggs
2 jars of pasta sauce + 1/2 c water
1 lb. No Cook Lasagna Noodles
1 lb. Italian Sausage, cooked and drained
4 c. shredded mozzarella cheese
Preheat oven to 350 degrees. Mix the ricotta, parmesan, and eggs well. Combine the 2 jars of pasta sauce with the 1/2 c water. In the bottom of a greased lasagna pan, spread 1 cup of sauce. Top with 1 layer of noodles, then spread with some of the ricotta mixture, sprinkle with sausage. Spread more sauce and sprinkle with mozzarella. Repeat these layers until you have no more noodles left. On top of the last layer of noodles, pour remaining sauce and sprinkle with remaining mozzarella. (I often need to use about another 1/2 jar of sauce and 1 c. mozzarella, sometimes I even need a little more ricotta too.) Cover with foil. Bake for 50 minutes. Remove foil and bake an additional 10 minutes until cheese is brown and bubbly. Let stand 15 minutes before servings, cover with foil while it sits to hold the heat in.


Feast your eyes of those lovely layers!
Cake:
4 eggs
1 tsp. vanilla
3/4 c. sugar
3/4 sifted cake flour
1 tsp. baking powder
1/4 tsp salt
Powdered sugar
Filling:
1 cup whipping cream
1/4 c. sugar
1/2 tsp vanilla
2 cup strawberries, cut up
powdered sugar
more strawberries (optional)
whipped cream (optional)
In a mixing bowl, beat eggs and vanilla on high for 5 min. gradually add sugar, beat until dissolved. Combine flour, baking powder and salt fold gently into egg mixture just until combined. Pour into a greased and waxed paper-lined jelly roll pan. Spread batter evenly over pan. Bake at 375 for 10-12 min. or until light brown. Turn out onto a cloth that has been sprinkled with powdered sugar. Peel off paper from cake; roll up cloth and cake. Cool. For filling, whip: cream, sugar, and vanilla. Unroll cake and spread filling over it, sprinkle with strawberries. Roll up cake again and chil 2 hours before serving. sprinkle with powdered sugar, garnish with strawberries and whipped cream.


Monday, July 20, 2009
Amazing Pumpkin Muffins
Another shocker about this recipe is that it uses boxed cake mix. Now, I rarely ever use boxed cake mix, but these really do turn out amazing, and you can hardly tell it's boxed mix. I recommend using the Duncan Hines Super Moist variety.
Yield: 18 muffins
1 box Spice Cake Mix
1/4 - 1/3 c. unsweetened applesauce
15 oz. canned Pumpkin
Preheat oven to 350 degrees. Line muffin pan with foil muffin cups. Combine all ingredients in large bowl. With the applesauce, add at least 1/4 c. and up to 1/3c to get a smooth consistency (Note: this batter will be very thick). Beat thoroughly with a hand mixer. If you don't beat the batter well enough, you'll end up with hard spots in your muffins. Pour equally into the muffin pans. Bake for around 12-15 minutes or until tops of muffins spring back when touched. Remove from muffin pan and cool on wire rack. Top with whipped cream, cinnamon, and caramel sauce.
*Note: I prefer using foil muffin tins because they don't stick to your muffins and are easy to pull off.

Looking good!


Oh it was so good, I could have licked the plate clean.